Listen to the Podcast
15 November 2024 - Podcast #908 - (16:54)
It's Like NPR on the Web
If you find the information TechByter Worldwide provides useful or interesting, please consider a contribution.

If you find the information TechByter Worldwide provides useful or interesting, please consider a contribution.
First of all, there’s nothing in God Mode that you can’t find elsewhere, maybe in Settings, probably in the Control Panel but possibly six levels down in sub-menus. Maybe it’s better to think of it as Index Mode or Librarian Mode. And that’s not to demean librarians, who are among the most knowledgeable and helpful folks anywhere.
God Mode is a feature of Windows 11 (and Windows 10, Windows 8, Windows 7). It might have existed even before Windows 7, but I don’t remember. You might find it helpful when you’re looking for a setting, but you’re not quite sure where to find it.
If the name “God Mode” makes you think of something like a Linux Super User, forget it. You can’t do anything with God Mode that you wouldn’t be able to do otherwise except possibly locate the setting faster.
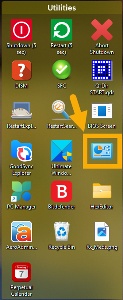
The God Mode folder, and that’s all it is, can be kept wherever you like. Some users keep it on the Desktop, and that’s where I have it in a Fences 5 area called “Utilities”. Double-clicking the icon opens Explorer and displays the contents. The folder contains links to more than 200 settings and options. Some examples:
Manage Bitlocker drive encryption, network settings, shares, and power settings; adjust what a laptop computer does when you close the lid; change what the power button does; add Bluetooth devices, printers, and other peripherals; use Microsoft’s File History to backup files; change file associations; show or hide files, file extensions, and directories; change the system date and time; modify accessibility settings; and more. A lot more.
These are all settings you’ll find somewhere, but God Mode gathers them into a neat, organized package.
Click any small image for a full-size view. To dismiss the larger image, press ESC or tap outside the image.
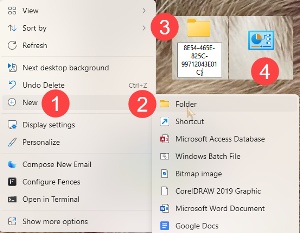 If you want to give God Mode a try, here’s how to create the special folder on your Desktop and, if you decide later that you don’t like it, all you have to do is delete the folder.
 Right-click an empty spot on the Desktop, click (1) New, click (2) Folder. Type or paste (3) this text into the dialog box for the folder name:
.{ED7BA470-8E54-465E-825C-99712043E01C}
Note the leading period and the braces.
If the name dialog closes before you can enter the text, right-click the folder and choose Rename from the context menu or just press F2 to rename it.
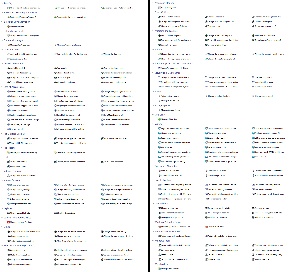 The illustration has been edited to show two columns. >>>
This is not
a view you can use in practice.
You can place a name in front of the text if you wish, but you won’t see it below the folder’s special icon. Prior to Windows 11, text left of the period was displayed as the folder’s name.
When you finish renaming the folder, its (4) icon will change to one that’s unlike any other icon on the desktop and double-clicking it will open the Windows Explorer and you’ll see the 200-plus settings in categories such as AutoPlay, Bitlocker, Color Management, Credential Manager, Devices and Printers, Windows Defender Firewall, and Work Folders.
Try the various view options. I prefer the view with icons. Or if you’d prefer a fully alphabetical listing, choose group by Name. To undo that change if you don’t like it, sort by Name and group by Application.
Although not related in any way to God Mode, there are other helpful links that you might want to place on the Desktop or in some other handy location.
These are shortcuts that open the Windows Explorer and navigate to special locations that you may need occasionally. The AppData/Roaming directory is a good example of this for me. I can get there quickly by pressing the Windows key and R (for run), typing %appdata%, and pressing Enter. Or by opening the Explorer and typing C:\Users\willi\AppData\Roaming. You’ve probably guessed already that I use %appdata% because it’s shorter. But what if I could get there by double-clicking a single icon?
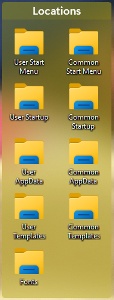 I can. There are several icons in a Fences 5 area called Locations on the Desktop. These are direct links to some of the locations I need occasionally, but that require typing either a long path name or a somewhat cryptic key word. Examples:
| Command | Location |
| explorer "shell:common start menu" | Start Menu All Users |
| explorer "shell:common startup" | Startup Applications All Users |
| explorer "shell:start menu" | Start Menu Current User |
| explorer shell:startup | Startup Applications Current User |
| explorer shell:fonts | Installed Typefaces |
| explorer shell:AppData | User AppData Folder |
| explorer "shell:Common AppData" | Common Program Data Folder |
| explorer shell:Templates | User Templates |
| explorer "shell:Common Templates" | Common Templates |
In a few cases, the link goes only part of the way to a needed location. To find Microsoft Word’s templates for the current user, start with the Roaming AppData Folder and drill down to Microsoft and then to Templates.
Did you know, for example that you can directly edit both the Startup folder that contains applications that run at boot time and the links in the Start Menu. With improvements by Microsoft or when using Stardock’s Start11 menu replacement, this is no longer as important as it once was.
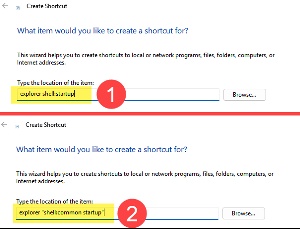 When creating these shortcuts, it’s important to wrap the shell part of the command in quotation marks if the term that directs the Explorer to the proper directory contains spaces. You can add quotation marks if the term has (1) no spaces, but they are not required. The quotation marks are essential when (2) spaces are included.
The process is easy. Right-click the desktop and choose New, Shortcut. Then type explorer for location. Type a space, then shell: and follow the colon with the appropriate term. No space between the colon and the word or words.
Windows makes available a lot of time-saving tweaks that help users get things done faster and with less effort. Granted, the time difference between clicking a single icon and typing 20 or 30 characters is minimal unless you can’t recall the exact 20 or 30 characters needed or you make a typo.
I’m a big fan of quick and easy.
When something goes wrong with nearly any electronic device, most tech support representatives will ask if you’ve turned it off and back on again. Well, Microsoft Windows techs may first tell you to run the System File Checker and the Deployment Imaging Service Module. Why is that?
I’ve never encountered a case in which SFC and DISM have solved a problem or even provided a decent clue, so I don’t know why those steps always seem to be at the top of Microsoft’s list. But for everybody else, power off and back on is usually the first step because it does fix the problem frequently.
For Windows computers, the recommendation now is usually to Restart the computer instead of running the Shutdown process. That’s because Windows has a fast-start option that retains information about the states of all running processes and Restart clears that information. If Fast Start is enabled, I recommend disabling it because it saves only a few seconds at boot time and it can create problems for users who think they’re clearing all memory by shutting the computer down.
Click any small image for a full-size view. To dismiss the larger image, press ESC or tap outside the image.
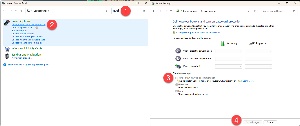 Open the the old style Control Panel. You may need to search for this if your computer has been updated to version 24H2. Alternatively, use God Mode as described previously. Either way, search for (1) power in the search box and then click (2) “Choose what the power buttons do”, deselect (3) “Turn on fast startup (recommended)”, and then click the (4) Save Changes button.
Clearing a device’s memory solves the problem when information in memory has been damaged. With millions of bits flying around inside computers every second, we probably shouldn’t be surprised when one of them goes awry and causes the device to become unresponsive. But keep in mind that not every bit that goes wrong will cause problems. Supervisor functions in software and firmware watch for known problems and usually can resolve them without bothering the user. So if you’ve ever seen an alert about an “unexpected error” and muttered “Are there any expected errors?” the answer is Yes. The system knows how to deal with expected errors and resolves most of them without having to bother you.
So before you call a support line for help when an electronic device seems to be malfunctioning, you can save time by restarting the device to see if that makes the problem go away.
In the 1950s, we had a World Book encyclopedia set at home and my parents added a copy of Encyclopædia Britannica. Although I can’t think of the time I last used it, we still have the books. Wikipedia is much faster and easier to use. It also has updated information may be more accurate.
Click any small image for a full-size view. To dismiss the larger image, press ESC or tap outside the image.
Today, the largest denomination US bill in circulation is $100, but larger bills were once used. From Wikipedia:
 The United States 10,000-dollar bill (US$10000) (1878–1934) is an obsolete denomination of the United States dollar. The $10,000 note was the highest denomination of US currency to be used by the public and was no longer issued after 1969. These notes are valuable (above their face value) to collectors and, since they are still legal tender, banks will redeem the notes for face value.
The first ten-thousand-dollar bills were issued as large-size paper money measuring 7.38 in (187 mm) by 3.18 in (81 mm). Following the 1928 series, the size of the bill was reduced to the small-size variety measuring 6.14 in (156 mm) by 2.61 in (66 mm).
$10,000 bills were the highest denomination of American currency ever used by the public. (A higher-denomination bill, the $100,000 bill, was used only for inter-bank transfers, did not circulate, and its possession by private holders is illegal.)
Note this these $10,000 bills were last printed in 1945, before In God we trust was added, and were removed from circulation, as Wikipedia noted, in 1969.
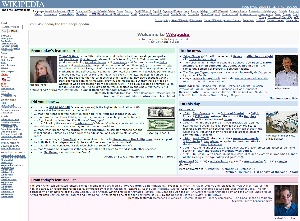 If you’re looking for information about technology, hardware, software, mechanical things, and anything that can be enumerated, Wikipedia is a great source. Surprisingly, it’s also frequently accurate about controversial topics. Two weeks before the election, I checked Wikipedia’s articles on Kamala Harris and Donald Trump. Both were written in an even-handed, unbiased way. The writers and editors are volunteers, but crowd-sourcing has been shown to work quite well.
Encyclopædia Britannica discontinued printing books in 2010 and switched to online and DVD offerings. The DVDs are gone, replaced by online subscriptions ranging in price from $75 per year for individuals and $100 per year for families. The family plan includes Britannica Kids. By contrast, Wikipedia is free but donations are requested.
Wikipedia describes itself this way: “Wikipedia is a free content online encyclopedia written and maintained by a community of volunteers, known as Wikipedians, through open collaboration and the wiki software MediaWiki. Wikipedia is the largest and most-read reference work in history, and is consistently ranked among the ten most visited websites[.] Founded by Jimmy Wales and Larry Sanger on January 15, 2001, Wikipedia has been hosted since 2003 by the Wikimedia Foundation, an American nonprofit organization funded mainly by donations from readers.”
Wikipedia also describes its competition: “The Encyclopædia Britannica (Latin for ‘British Encyclopaedia’) is a general knowledge English-language encyclopaedia. It has been published by Encyclopædia Britannica, Inc. since 1768, although the company has changed ownership seven times. The encyclopaedia is maintained by about 100 full-time editors and more than 4,000 contributors. The 2010 version of the 15th edition, which spans 32 volumes and 32,640 pages, was the last printed edition. Since 2016, it has been published exclusively as an online encyclopaedia.”
Anybody can submit or edit a Wikipedia article, and it would be reasonable to expect that this would lead to chaos and inaccuracy. But anyone can also correct inaccurate information. Unlike previous encyclopedias that required peer-reviewed articles, Wikipedia depends on crowd-sourced intelligence.
Early in Wikipedia’s history, academics often reacted with scorn. Certainly Wikipedia must be full of errors! But Britannica also has errors, even with peer-reviewed articles. But as early as 2005, rigorous comparisons showed that Wikipedia is generally as accurate as Britannica, and that it reacts faster to correct inaccurate information.
If you’re looking for information, Wikipedia is an excellent place to start. And if you use Wikipedia regularly, making a donation is an even better idea.