Listen to the Podcast
6 December 2024 - Podcast #910 - (17:01)
It's Like NPR on the Web
If you find the information TechByter Worldwide provides useful or interesting, please consider a contribution.

If you find the information TechByter Worldwide provides useful or interesting, please consider a contribution.
Artificial intelligence continues to be the primary development areas for Adobe’s products. In fact, it sometimes seems that this is the only place where Adobe is spending time and money on development. That’s not the case, but the AI advances are so dramatic that it can be hard to see other work.
Lightroom continues to become more like Lightroom Classic and works with the mobile Lightroom Camera, which isn’t supported by Lightroom Classic. Even so, Lightroom seems to be intended primarily for those value support for mobile photography while Lightroom Classic is designed more for professional and advanced amateur workflows. That they’re both included in Adobe’s Photography bundle gives photographers the choice.
Let’s get pricing out of the way first. There are three packages, two at $10 per month and one at $20 per month.
Lightroom, Lightroom Classic, Photoshop for Windows or Mac, Photoshop for IPad, Lightroom for mobile and web, Portfolio, and 20GB of storage comprise one of the $10/month plans. The $20/month plan includes the same options and expands online storage to 1TB. The second $10/month plan includes only Lightroom on desktop, mobile, and web, Portfolio, and 1TB of storage. If you need to justify any of those costs and you’re old enough to remember film, think about what you paid every month for film and processing.
In comparing online storage, Adobe says 20GB is sufficient for about 4000 JPEG images and 1 TB is enough to manage about 20 thousand raw images or 200 thousand JPEG images. These numbers will vary depending on the average size of your images. If your raw photos are 50MB each instead of 20MB each, the total number of images that can be stored will be lower.
For those who desire additional applications such as Dreamweaver for website design, Premiere and other post-production apps for video editing, InDesign for page and publication design, Illustrator, Express, Adobe Fonts, Scan, and more: Most of the individual apps can be added for $10/month or you can sign up for the full Creative Cloud package at $60/month.
Click any small image for a full-size view. To dismiss the larger image, press ESC or tap outside the image.
 Denoise and Remove Distractions are new features in Lightroom Classic. Although a noise removal feature has been present for several years, the new Denoise function uses AI to improve the image. It works only with raw images, not JPEGs, and it creates a gigantic copy of the original image. In my tests, the duplicate image is usually about twice the size of the original.
Here’s a photo of a duck from 2018 at Sharon Woods Metro Park. It’s not a particularly noisy image, but I knew it could be improved.
 I started with the traditional luminance noise reduction feature. The noise is reduced, but the image is also a bit softer. This is a view at 1:1 resolution in Lightroom Classic, so it’s just the center part of the image. If I had bothered with denoise at all, I probably would have accepted the results of this edit, but the image has another issue that I wanted to use to illustrate another new feature, so I used it for the new Denoise feature, too.
 In addition to creating a much larger copy of the file, Denoise uses cloud-based processing. The amount of time required will be substantially more than the legacy function, which is essentially instantaneous. For this image, the process took about 10 seconds and that’s certainly acceptable. This is not a feature you’ll want to use with every image because Denoise creates a new, larger copy of the file.
 The adjustment I chose reduced the noise, which is most noticeable in the dark areas of the duck while doing a good job of retaining detail. But look behind the duck’s head. Part of a tree branch floating in the water looks like it has pierced the duck. This would have been a nightmare to fix using just the clone stamp tool, which is still relatively new to Lightroom Classic and not as functional as in Photoshop. So I probably would have sent the photo to Photoshop, removed the branch there, and returned it to Lightroom Classic.
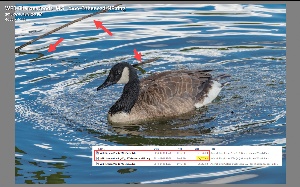 That’s not the only problem, though. The full-frame image shows another distracting branch in the upper left, and there are some reflections in the water. Again, not an easy job to fix even in Photoshop.
Note, too, that following the Denoise process, the original 28MB image has been joined by a new image that at 57MB is approaching twice the size of the original.
 To remove the branches, I activated the Remove Distractions function and painted a mask over both branches and their reflections.
 Lightroom Classic did the rest. the branches are gone and the duck is the center of attention, as ducks often are. The highlights in back are somewhat distracting and the entire image could use a bit of vignetting. Lightroom Classic handles that easily.
 The addition of powerful new features like this in Lightroom Classic means that even more post processing can be done here instead of creating a copy that needs additional editing in Photoshop.
But Photoshop is still ready to step in when the editing requirement exceeds even what Lightroom Classic can do.
Photoshop’s Remove Distractions feature is astonishingly good except for when it isn’t. When it fails, the result is horrid, but there are workarounds.
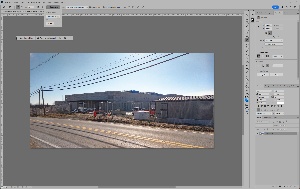 Here’s the image I started with. Knowing that the needed corrections were well beyond what Lightroom Classic could handle, I sent it to Photoshop. I wanted to clean up the numerous overhead power lines, so I selected the remove tool and chose “Wires and Cables” from the context menu.
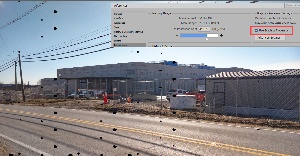 The result was abysmal. The wires remained and Photoshop had dropped black dots in seemingly random locations. This apparently is, in part, a hardware problem. My primary computer, a notebook, has a graphics processing unit (GPU), but apparently it’s not sufficiently powerful for this function. It’s essential to turn off GPU processing and have the CPU handle the entire task. This also extends the time required for Photoshop to calculate and apply the changes.
 As if by magic, the wires are gone. Entirely. Beautiful job, Photoshop. But keep looking at the image. The poles are still there and the shadows from the wires remain on the road. This is the kind of task that would have required the clone stamp tool previously, but Remove Distractions can be applied with a brush.
 Next I applied a mask over the power line poles and the shadows on the roadway.
 Gone! Doubtless Adobe will eventually figure out how to deal with substandard GPUs so that users will gain the speed benefit of the GPU without the disastrous effects that I saw in trying to remove wires.
Remove Distractions also knows how to deal with people you’d like to eliminate from an image. Perhaps random people in the background of a family vacation picture.
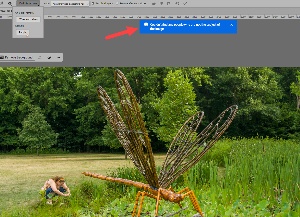 The first image I selected for testing included my younger daughter several years ago at Inniswood Metro Gardens when a “Big Bugs” exhibit was there. I wouldn’t normally remove her from this image, but it seemed like a good test image. Photoshop disagreed, telling me it didn’t see any people who weren’t the subject of the image.
I could have used the masking tool, but I wanted to show the result of Photoshop’s automatic selection.
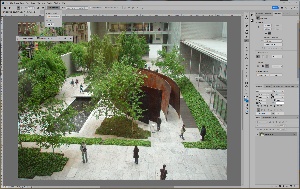 So I picked a photo my younger daughter had taken in New York City in 2007. It shows a sculpture by Richard Serra in the courtyard of the Museum of Modern Art from the second floor. There are several people in the courtyard and, if this was your photo, you might have wished that no people were present.
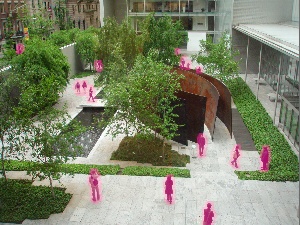 Photoshop did an exemplary job of selecting and masking people, even one person that was across the street, well outside the museum’s courtyard. No additional effort was required on my part. But how good was the replacement.
 It’s as if nobody had been there on that spring day in 2007 or that she had waited for the exact perfect moment when the courtyard was empty. But this is MoMA. This is New York City. Waiting for the courtyard to be fully empty of people would have been a fool’s errand. She’d probably still be standing there, waiting.
So those are a few of the new features that are in Adobe’s 2025 version of its photo editing tools. If you look back over just the past three or four years, it’s clear how much Adobe has pushed photo editing forward. The advantage of AI is that it can handle the drudgery, the tasks that take a long time to complete, are tedious, and are far from creative. People can eliminate those tasks and work on the creative bits they enjoy.
There are two ways criminals can make Facebook users’ lives miserable. One involves cloning the account by creating a look-alike identity and attempting to convince the victim’s friends to become friends of the new account. The crooks can also take over the account, change the password, and lock the user out.
As annoying as having the account cloned is, it’s trivial when compared to the damage thieves can do if they take over your Facebook account. That’s why it’s essential to prevent the crooks from getting their foot in.
Let’s first consider how difficult it can be to regain access to an account if thieves get in. Facebook sends an email when certain account changes are made. New email address or new password, for example. If you receive such an email, immediate response is required. First, of course, you need to be sure that the message came from Meta. Look for all of the usual clues that suggest fakery. Once you’re sure, move fast because you can be sure that the crooks are working as fast as they can to make changes that will lock you out.
Also keep in mind that Meta has no customer support. There’s no web form, email address, or phone number. Anything you find that purports to be Meta or Facebook support is a scam.
Don’t delay. My older daughter received such a message, ignored it, and we had to set up a new account for her, with a stronger password and two-factor authentication.
When Facebook notifies you that your password has been changed and you didn’t change it, examine the message to see if there is an option to reverse the change. If so, choose that. Be sure that the link in the email actually goes to Facebook.
If that option isn’t available try to log in and change your password. If you can’t log in, use the “Forgot Password?” process. You need access to the email address and phone number that are associated with your account.
Facebook will send confirmations to the email address, the phone, or both.
If you are able to regain access, go to account settings and enable two-factor authentication for added security. This will require a code sent to your phone or email whenever you log in from an unrecognized device. Then review your account activity for any unauthorized posts, messages, or changes.
Review and update security settings you’ve established for Facebook and make sure your email and phone number are up to date. If you have used your Facebook password for any other account (email, bank, store), change those passwords, too, and don’t reuse any password.
Facebook has a security checkup tool. Use it and pay careful attention to the recommendations.
Two-factor authentication adds an extra layer of security beyond your password. If someone gains access to your login ID and password, they won’t be able to log in if they don’t have access to the device or service you’re using for 2FA.
When Facebook receives an attempt to log in from an unrecognized device or location, it will require the second form of verification. While this doesn’t entirely eliminate phishing attacks, it mitigates the risk.
To enable two-factor authentication, follow Facebook’s instructions that are provided for computers and both Android and IOS mobile devices.
TechByter Worldwide is no longer in production, but TechByter Notes is a series of brief, occasional, unscheduled, technology notes published via Substack. All TechByter Worldwide subscribers have been transferred to TechByter Notes. If you’re new here and you’d like to view the new service or subscribe to it, you can do that here: TechByter Notes.