Listen to the Podcast
22 November 2024 - Podcast #909 - (16:23)
It's Like NPR on the Web
If you find the information TechByter Worldwide provides useful or interesting, please consider a contribution.

If you find the information TechByter Worldwide provides useful or interesting, please consider a contribution.
A key exists on computer keyboards that has no reason for being there. Over the years, I have physically removed the key as well as pulling the keycap off, squirting in some super glue, and replacing the key. Eventually I learned how to disable the key with a Registry edit and then a utility called SharpKeys arrived. That was a long time ago, and it’s still an important utility to have.
By a “long time ago”, I mean 2003. That’s when a guy named Randy wrote it. Randy doesn’t publicize his last name. He moved from Connecticut and now lives in the northwest, apparently in the vicinity of Microsoft. His SharpKeys utility is offered in the Microsoft Store.
To get back to the main subject, have you figured out which key it is that I dislike so much? iT’S THE ONE THAT, IF ACCIDENTALLY PRESSED, MAKES IT LOOK LIKE YOU’RE SHOUTING. Yeah, the CapsLock key. You can make CapsLock act like the Shift key or disable it altogether with a Registry edit, but the edit is far from simple. I’ve described it previously, but won’t do that again because it’s much easier to get SharpKeys from the Windows Store, install it, set it to disable CapsLock (my preference) or make it act like the Shift key, restart the computer and get on with things.
Click any small image for a full-size view. To dismiss the larger image, press ESC or tap outside the image.
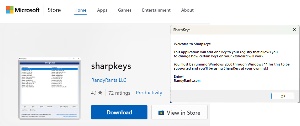 Maybe you don’t like CapsLock either. Or maybe you wish that one key acted like another key. That’s why you’d want to download SharpKeys. The utility isn’t the actor responsible for changing the behavior of the keys; it simply makes some Registry edits and the registry handles the actual changes.
It includes a list of common keyboard keys and a “Type Key” function the user can enable to let SharpKeys identify the key you want to change. Two warnings are important: First, SharpKeys may not be able to modify specialized keys added by the keyboard manufacturer: If there are special keys for raising or lowering volume, for example, those keys may not be modifiable because they are processed by the keyboard and not by Windows. Second, and actually more important, is that some keys should not be disabled. Disable the Del key, and you will have effectively turned the computer into a brick because Ctrl-Alt-Del will no longer work.
You can’t assign a complex keystroke to a single key. If you’d like the F7 key to act as a Save key (Ctrl-S), you can’t do that with SharpKeys. There is a way to do this with another utility, though, and I’ll get to that in a bit.
If you want to turn the standard QWERTY keyboard into a Dvorak keyboard, SharpKeys will do it. Or if you want to switch the functions of the Left Windows key and the Left Control key, you can do that.
Don’t try to map mouse clicks to keys, though. That doesn’t work. Also, be aware that key mappings are not user specific. If you share the computer with a spouse or a friend, the changes you make in your account will affect their accounts, too.
All of the changes SharpKeys make can be made directly with Registry edits, but avoiding direct Registry edits is wise. The utility is easy to use and it won’t make any typos in the Registry.
When you start SharpKeys, Windows will display a User Access Control warning. If you have made manual changes, it will recognize them. If your computer has two keyboards, it’s important to be sure that the key you think you’re mapping is the key you’re really mapping. Many people who use notebook computers attach full-size keyboards to them and SharpKeys can see both of keyboard.
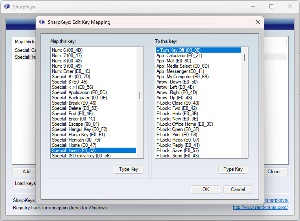 It may also report a lot of “unknown” keys. There are hundreds of keyboard models and many include extra keys that don’t use standardized scan codes that apply to common keys. The easiest way to identify the key you’d like to change is to click the “Type Key” button on the key mapping dialog box and then press the key. SharpKeys will select the appropriate value and fill it in. If you want to remap either the Left Alt or Right Alt key, though, pressing the key won’t work and you’ll need to find it in the list of keys. They’re in the “Special” section: Left Alt (00_38) and Right Alt (E0_38).
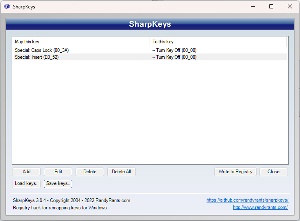 Once you’ve identified the key to change, it will appear in the left column. The top option in the right column is Turn Key Off. Select that or choose the key to mimic. The Ins key toggles between overtype and insert. I never want overtype mode. Never. So I’ve disabled it, too.
After defining all of the mappings you want to use, press the Write to Registry button. You’ll then need to reboot the computer or at least log out so that the Registry will be re-read to enable the new mappings.
If you’ve created several mappings that you’d like to use on another computer, click Save Keys to write a file. Take that file and the SharpKeys executable to the other machine, run the application, use the Load Keys button to import the settings, and then click Write to Registry on the second machine.
As helpful as SharpKeys is, it doesn’t accomplish everything you might like to do when modifying the computer’s keyboard. Fortunately Microsoft’s free PowerToys set of utilities includes Keyboard Manager, a utility that works well with SharpKeys.
Click any small image for a full-size view. To dismiss the larger image, press ESC or tap outside the image.
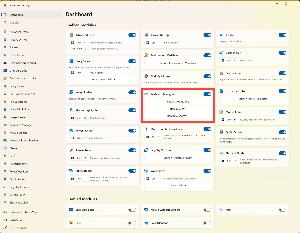 Start by downloading and installing PowerToys. Then open the PowerToys control panel, select Keyboard Manager, and enable it. There are two primary options, Remap a key and Remap a shortcut.
Any keys that you modify with PowerToys will be active only when PowerToys is running. This differs from keys modified using SharpKeys. Because SharpKeys writes changes to the Registry, its changes are effective as soon as the Registry has been read, which is early in the Windows startup process. PowerToys Keyboard Manager must wait until Windows is fully operational to load. Additionally, if you use a startup manager to delay PowerToys, that will also delay Keyboard Manager.
The advantage here is that if a second computer user doesn’t like the modifications you made with Keyboard Manager, the utility can be disabled.
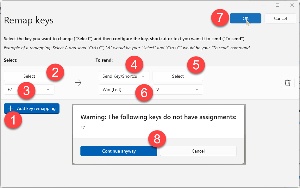 You know that SharpKeys can’t map multiple keys to a single key. If you decide, for example, that you’d like the F7 key to send the keystrokes that call the advanced Windows paste function (Windows Key + v) to display all items on the paste buffer, you would choose the Remap a key option, click the (1) Add key remaping button, click the (2) Select button in the left column and (3) press the F7 key, click OK to move to the right column, make sure (4) Send key/shortcut is selected, press the (5) Select button, and press the (6) Windows Key and v, click the OK button, and then click (7) OK at the top right of the screen. Keyboard Manager will warn you that F7 will no longer have its standard function. Click (8) Continue anyway to proceed with remapping the key.
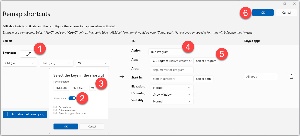 You can also assign key combinations to activate shortcuts. Maybe you’d like to use Ctrl-Shift-W to start Microsoft Word. In that case, choose Remap a shortcut, then click Add shortcut remapping on the next screen.
Click the (1) pencil icon, make sure (2) allow cords is selected, press (3) Ctrl-Shift-W, and click OK. Then in the right column, choose (4) Run Program, type the location of the app if you know it or click (5) Select program to navigate manually. When you have filled in all of the information, click the OK button in the upper right corner.
Keyboard Manager offers many additional options. These are all covered on Microsoft’s website.
Forty-year-old technology may seem like something from the stone age, but some things that were invented in the 1980s and 1990s can still be useful. Sometimes faster or better than the latest and greatest.
Remember DOS? That’s where Microsoft started, then they built a shell that sat on top of DOS for the first few versions of Windows. It wasn’t until Windows 95 that we had an operating system instead of a DOS add-on. Before then, I used a lot of batch commands for all kinds of tasks, including one that operated as a menu to start the dozen or so applications on the computer. The batch file displayed a numbered list of applications. To start a program, I typed the number associated with it on the menu and pressed Enter. The batch command then changed to the appropriate directory, launched the program, and opened again when I closed the program.
Yeah, those were the days of using one program at a time. As recently as 2010, SevenForums, a help site for users of Windows 7, was still showing users how to create a menu file using a DOS batch command. Such a file might be called MENU.BAT and could look like this:
@echo off
:menu
echo 1. Open Wordperfect
echo 2. Open Lotus 1-2-3
echo 3. Exit the menu
set /p choice=Choose an option:
if %choice%==1 start c:\wp\wp.com
if %choice%==2 start c:\lotus\123.com
if %choice%==3 exit
goto menu
With the graphical user interface and menus such as the one built in to Windows or a third-party menu such as Stardock’s Start11, there’s no longer a need for a simple menu like that and Windows wouldn’t allow the user to save the menu in the root directory of the boot drive anyway.
The graphical user interface, which wasn’t invented by Microsoft or Apple, was slower than using DOS commands for many jobs and batch files performed repetitive tasks flawlessly. I hung on to DOS until Windows 95 showed me that the GUI could perform some operations faster and better than DOS.
By the way, the graphical user interface was invented in Palo Alto, California, by Xerox at the Palo Alto Research Center. PARC, as it was known, was sufficiently far from Xerox’s east-coast headquarters that it got away with doing research the bean counters couldn’t understand. In addition to the graphical user interface, PARC invented the mouse, the laser printer that was then licensed to Hewlett-Packard, the concept of a notebook computer that was envisioned as being like a pizza box, and much of the technology that runs the internet. But we’re off topic again.
What looks a lot like the old DOS command line still exists in Windows 11, along with a newer alternative called PowerShell. Batch files continue to be useful and, in my world, important. When I want to shut the computer down, restart the computer, or get to the device’s BIOS settings, I use a command line script.
You probably know how important I think backup is, which is why I use multiple methods to secure important files in multiple locations. Most of these involve some cost. But any backup, even a backup that’s retained on an external drive that’s stored in the same building as the computer is better than nothing. Batch files can be helpful.
Copy and XCopy are two antique DOS commands. The first was used to copy small groups of files and the second was used to copy files and directories. Now there’s Robocopy, which is a more powerful version of XCopy, which it is intended to replace. “Robo” has nothing to do with robots. It stands for “robust”. It’s not as good as an online backup service such as Backblaze, a utility such as GoodSync, or a backup application like AOMEI Backupper, but it can be used to mirror directories in addition to its ability to copy, move, or archive files. It can be set to copy only new or changed files. It honors the archive bit. Because of the mirroring option, the first backup will take longer than subsequent uses. Robocopy can even be set to watch a directory for changes and then to copy files that have changed.
If you’d like to learn more about Robocopy, check out Lazy Admin’s article.
Keep in mind that you can no longer (easily) write batch (BAT) or command (CMD) files to the root directory of the boot drive, but they can be stored elsewhere. Here are a few ways you might consider using them.
@echo off
robocopy "C:\ImportantFiles" "D:\Backups\ImportantFiles" /E /Z
@echo off
start "C:\Path\To\Your\Application1.exe"
start "C:\Path\To\Your\Application2.exe"
start "C:\Path\To\Your\Application3.exe"
start "C:\Path\To\Your\Application4.exe"
@echo off
echo ############# CHECKING FOR NEW SYSTEM FILES #############
echo Please wait. Press any key to close this window when the process is complete.
echo #########################################################
dism /online /cleanup-image /restorehealth
echo The process is complete.
timeout /t -1
exit
@echo off
taskkill /f /IM explorer.exe
start explorer.exe
pause
exit
Those are two rather silly examples along with two that I use regularly. Batch command files can be used in a variety of ways to streamline tasks and improve productivity, even on Windows 11. Master batch scripting and you can save time and reduce the potential for errors in repetitive tasks.
TechByter Worldwide is no longer in production, but TechByter Notes is a series of brief, occasional, unscheduled, technology notes published via Substack. All TechByter Worldwide subscribers have been transferred to TechByter Notes. If you’re new here and you’d like to view the new service or subscribe to it, you can do that here: TechByter Notes.