Listen to the Podcast
3 Nov 2023 - Podcast #856 - (21:24)
It's Like NPR on the Web
If you find the information TechByter Worldwide provides useful or interesting, please consider a contribution.

If you find the information TechByter Worldwide provides useful or interesting, please consider a contribution.
Adobe’s work on artificial intelligence is breathtaking. Granted, the company has been working on AI for several years, but the introduction of Firefly earlier this year and its rapid advancement across many of the company’s applications has been faster than most of us expected. And, as I’ll describe in Short Circuits, it appears that the process will only accelerate.
One new feature in Lightroom and Lightroom Classic is in a renamed control that is now called Color Mixer. Previously, this section included HSL (hue, saturation, and luminance) adjustments. The user could select red, orange, yellow, green, aqua, blue, purple, or magenta and control the color (hue), the amount (saturation), or the brightness (luminance). These controls still exist and there is still an eyedropper tool that allows the user to select a color from the image and adjust any of the three settings. The disadvantage to the HSL controls is that they affect the entire image and could not be used with Lightroom’s powerful masking.
Click any small image for a full-size view. To dismiss the larger image, press ESC or tap outside the image.
 The new Point Color adjustment can be used to modify the entire image, but it’s also replicated in the masking section. The eyedropper tool selects the color that will be modified, but the changes are applied only in the masked area. If I wanted to change the color of the foliage in the photo of the gray cat (Scampi) to make it appear that the picture was taken during Autumn instead of Summer, masking the background allows me to shift the colors without making any changes to the cat.
Artificial intelligence is being added to more than just Lightroom and Photoshop, but I’ll limit this report to only the photo applications.
 Let’s say we have a photo of a (1) house in a valley. It’s a nice enough house, but maybe we’d like the image to have a larger stone house. After drawing a selection around the house, I can tell Firefly’s Generative Fill process to (2) replace the house with a stone castle. Then I might decide that I’d like more of the creek to be visible. That can be accomplished by selecting the embankment and using (3) Generative Fill without providing any guidance. And finally I’d like the image to be horizontal instead of vertical, which is a job for Generative Expand. Using the crop tool, I (4) add space on both the left and right sides of the image. Firefly expands the mountains in the background and the creek in the foreground.
 Let’s give Lightroom Classic and Photoshop a slightly larger challenge. I had a photo of Chloe Cat that I wanted to use for a Facebook post, but the original image was from a smart phone. The cat was too small in the image, she was behind a footrest, and (1) zooming in still left some of the footrest, accentuated JPEG artifacts, and made a blue box in the background even more obvious. There was also a horizontal line in the background that looked like it went through the cat’s head.
After cropping and making a few other changes in Lightroom Classic, I edited the image in Photoshop. Generative fill (2) took care of the blue box and the horizontal line. I also used Generative Expand to extend Chloe’s body where the footrest had been, but the roughness of the image was still present. One of the relatively new Neural Filters (3) removed the artifacts and left me with a workable image.
 I’ve wondered from time to time what a cat would look like wearing a crown, so I pulled out another photo of Chloe, drew a selection around and above the top of her head and then used the prompt “golden crown with jewels fitted to cat’s head”. It took several iterations to get the effect I was looking for, but here we have Queen Chloe the First.
 Perhaps you’d wonder what it would be like if you looked up and saw a mythical red and blue dragon flying above your neighborhood. This is what Adobe thinks it might look like. You may say that this image doesn’t look very realistic, but consider this: Dragons do not exist, so how could a “realistic-looking dragon” be portrayed?
 I wanted to try two modifications with a bush from Inniswood Metro Gardens. The image is horizontal, but what if I need a vertical image. This is another job for Generative Expand. Drag the top boundary up and click the Generate button. All three of the possibilities work well.
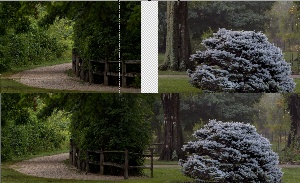 And last, I wanted to try something that would be far more difficult. I started with two images, one that has a gravel path with a wooden fence leading around some foliage. The other is the bush from the previous image. There’s a path in the background. There’s little in common between these two images, but let’s see if they can be joined.
I drew a selection area that spanned some of each image and the blank space between the images. Then I told Firefly to generate the transition. The result, while not perfect, is surprisingly good. The result could be improved by selecting the path in the background of the image of the bush and having Firefly replace it with grass. Then I might select a bit of grass in the image on the left and have Firefly extend the gravel path into the newly generated section of the image.
What we’re seeing is the ability to modify images in ways not possible before, or at least not possible unless the person making the changes was an incredibly talented airbrush artist. The fact that Firefly can perform a complex airbrush job that could take hours, convert it to a task that takes only a few seconds, and create a result that would be better than what the airbrush artist could do is simply astounding.
A day or two later, I revisited the combined image and repeated the process I’ve already described. Then I selected the sidewalk in the right part of the combined image and replaced it with grass and selected the grass in the left part of the image and extended the gravel path. Here’s the result:


 Adobe has also added a lens blur effect to Lightroom Classic. Keeping the main subject in focus and allowing the background to fall out of focus is a good way to keep the viewer’s attention on the subject. I had done a fair job with an image of a sculpture in front of the Old Worthington Library building (left), but the flowers and cars in the background were distracting. Although I could have used Generative Fill in Photoshop to eliminate the clutter, I chose instead to use the new lens blur effect in Lightroom. The result serves well, even though the process isn’t perfect. Look particularly at the left edges of the bushes where pavement is visible further back.
Another option might be to use the lens blur effect and then to transfer the image to Photoshop where Generative Fill can finish the job.

Does this image lie? Yes, it does, but there is no intent to make the image anything more than it is: A depiction of a statue in front of a library. Consider the way our eyes work. Standing in front of the library, you would see the statue. Your eyes would also “see” the clutter in the background, but your brain would discard it as non-essential information. So no harm; no foul. This differs from an image in which two people are composited together in an attempt to show a relationship that does not exist. That’s where the danger lies. Although images have been able to lie from the day photography was invented, this technology makes it much easier for anyone to create fakery. As humans, we need to fine tune our skepticism starting now.
As amazing as Adobe Max was this year with all the new AI features, it would be tempting to say “You ain’t seen nothing yet!” That’s because you ain’t seen nothing yet. Firefly for example is less than a year old and already it’s at version two.
Adobe has been working on AI for several years with Content-aware Fill and other features that aim to automate boring tasks and drudgery that nobody really wants to do. A good example of this is removing a distracting element in a photo. Doing this manually with the clone tool is easy enough, but it’s time consuming, no fun, and boring. Content-aware Fill was a great start, but Generative Fill is a gigantic improvement despite the current limitations.
The annual Max program always includes a session called “Sneaks” in which Adobe chooses ten projects that its developers are working on and show features that might be included in next year’s updates or may vanish without a trace. The fact that they have to select ten should tell us something: Clearly Adobe’s developers are working on more than ten new features.
You may wonder what made the cut this year. Well, wonder no more.
Generative Fill comes to video. This one was obvious. If Generative Fill can be used with still photography, why not video? There are lots of why-nots, but possibly the most obvious is the amount of data required to modify 30 or 60 frames every second. Or how to maintain continuity from one clip to the next. In some ways, this is the modern equivalent of creating a matte, as has been done in motion pictures for nearly 100 years.
Creating a storyboard is an essential step for any video project, but it’s also helpful for any other process that includes visuals. Adobe Firefly can already take a prompt such as “Show me an orange cat on a leather chair by a window” and turn it into a remarkable visual, but this project’s objective is to allow the human to draw a rough sketch, sometimes an extraordinarily rough sketch, and then to use that information along with the description to provide the image.
Those who create 3D mock-ups in Illustrator will be delighted by Project Neo because it converts two-dimensional drawings to 3D and manages to handle perspective without requiring the user to master the complex process of creating perspective grids. The goal seems to be making the program work the way the user thinks it should work when object are overlaid or combined.
This was possibly the most mind-bending project shown in Sneaks. It primarily involves compositing two videos, one of a subject walking and the other of an office. The subject is isolated in the first video and both perspective and motion are modified in the combined video to create a realistic effect. This is obviously magic because it’s clearly impossible to do what the demo showed. That was just the start. The developer was also able to composite a video of him walking around objects such as a coffee cup on a desk even though the camera motion didn’t match between the two shots.
What if your clothing could display messages or change patterns? Or your curtains could change. Research scientist Christine Dierk wore a dress that changed in appearance at the push of a button, or randomly, or based on her motion. Watch for this in upcoming fashion shows.
Project Glyph Ease uses generative AI to create stylized and customized letters in vector format, which can later be used and edited. In plain English, this means you can see a typeface, capture three letters for reference, and allow Adobe AI to generate the rest of the letters. The resulting images work just like any other typeface.
Project Poseable is another 3D application that eliminates the need to learn how complex 3D imaging applications work and allows the user to design 3D prototypes and storyboards. The software can create various angles and poses of individual characters and modify how the character interacts with surrounding objects in the scene.
Some old television programs were shot on film that was then converted to video. Those old programs can be re-released in HD video simply by re-scanning the old films. But what about programs that were shot in standard NTSC video? What about old home videos? Project Res Up is a video upscaling tool that uses diffusion-based technology and artificial intelligence to convert low-resolution videos to high-resolution videos. If you have blurry old videos, there is hope for them.
This is probably my third “this is impossible” projects. It uses generative AI to translate and dub the voices in a motion picture into 70 languages. No big deal? But what if the dubs were rendered in the voices of the actors? Replicating voices is something that worries me, but what if I spoke only German and could watch The Maltese Falcon in German with the voices of Humphrey Bogart and Mary Astor? As scary as this is when thinking about those who would use the technology to create disinformation, it’s still remarkable for those who simply want to enjoy motion pictures in their own language. Not being able to speak the target languages, it’s unclear how good the translations are and how well the translations handle idioms. But it’s a start. Concerned? See this Washington Post article.
If you’ve ever taken a photograph through a window, you’ve encountered a problem that Project See Through can fix. There are lots of reflections that obscure what you want to see. Project See Through is an object-aware editing engine that can fill in backgrounds, cut out outlines for selection, and blend lighting and color.
Moving an object from one place to another in a photo can be done, but not easily. At least, not yet. What if you could just select one or more people, pick them up, and move them? That’s what Project Stardust is all about. The future is absolutely astonishing.
If you’d like to see these previews in action, check out Adobe’s Sneak session. Which of these will be with us a year from now?
Microsoft has started pushing this year’s Windows feature update out to computers, but not everyone who wants the update has received it. It’s easy to obtain if you want it.
If you’re opposed to the update, skip this section. Version 23H2 does contain several useful features, but you may not need those features or you may not want them. But if you do want or need the new features and haven’t yet received the update, here’s how to get it.
Click any small image for a full-size view. To dismiss the larger image, press ESC or tap outside the image.
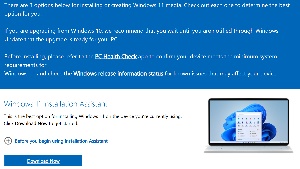 You’ll want Microsoft’s Windows 11 Installation Assistant, which you can download from Microsoft’s website. The file is small, so the download won’t take very long.
Next, double-click the file you’ve downloaded to start the update process. When it’s complete, open Windows Settings and confirm that the (1) Windows version is now reported as 23H2.
 The most significant new feature in Windows 23H2 is Copilot, which I wrote about on 20 October. To display Copilot on the Task Bar, right-click a blank area on the Task Bar and choose (2) Taskbar Settings. Make sure that the Copilot toggle is on. The icon will then appear (3) on the Task Bar.
Copilot includes several AI-powered tools that assist with various tasks such as coding, writing, and searching. In last week’s blog entry, I needed to create two side-by-side columns to compare input to and output from a service. Instead of writing the code myself, I asked Copilot to do it. The code was workable and I made only a few changes to make it do what I wanted it to.
Copilot is being developed by GitHub, OpenAI, and Microsoft and it can be used in Microsoft 365 Apps such as Word, Excel, PowerPoint, Outlook, and Teams. A separate version, Microsoft Sales Copilot, connects to customer relationship management systems such as Salesforce.