Listen to the Podcast
21 July 2023 - Podcast #841 - (17:48)
It's Like NPR on the Web
If you find the information TechByter Worldwide provides useful or interesting, please consider a contribution.

If you find the information TechByter Worldwide provides useful or interesting, please consider a contribution.
When you told your browser to connect to techbyter.com, the browser first examined a hosts file on your computer, probably found no information about techbyter.com, and sent a request to your internet service provider’s nameserver. That’s how it figured out how to get to techbyter.com.
Windows, Linux, and MacOS computers all have a hosts file. There are good reasons to use this file, but navigating to the techbyter.com website isn’t one of them. That’s the last you’ll hear about hosts in this report because your ISP’s nameserver service is probably not what you should be using.
“Nameserver” is a friendly name for “Domain Name Service (DNS)”, which is the process that converts names people can remember (techbyter.com) to an Internet Protocol (IP) address that identifies the site (67.222.41.89). It’s safe to assume that most people will find it easier to remember techbyter.com than 67.222.41.89.
When the destination address has been identified, procedures that operate the internet can identify the route between your computer and techbyter.com. On 4 July 2023 around 6:40 am, the route from my computer to the techbyter.com website involved 9 intermediate steps: Starting at 10.5.0.1 and passing through 10.215.172.3, 208.97.209.217, 141.136.108.189, 4.68.37.117, 4.69.219.58, 4.53.7.174, 69.195.64.111, and 162.144.240.11 on the way to 67.222.41.89. This route can change at any time depending on internet traffic and hardware availability. If one of these servers would be offline, the internet would choose a different route.
The first action is finding the destination IP address and your internet service provider’s nameserver is where the browser will obtain that information unless you tell it to use another service. You should because few ISPs provide exceptional DNS. I had used Google’s nameservers for several years, but recently I found a utility written by Steve Gibson that provides the information needed to make an intelligent choice.
Besides your ISP’s DNS, there are dozens of other services. There’s Google, OpenDNS, Cloudflare, and many more.
The responsiveness of the internet depends on a lot of factors, but one of the first is obtaining the IP address of the destination. Identifying the fastest DNS server for your location is what Gibson’s DNS Benchmark is all about. Gibson is a programmer and security expert best known for his SpinRite disk utility, which he sells, and his many other free utilities such as DNS Benchmark and LeakTest. The fastest DNS service for you might differ from what’s fastest for me because we’re at different locations.
The speed differences you’ll find among DNS providers are minimal, measured in milliseconds, but reliability also needs to be considered and that’s where ISP-provided DNS often comes up short.
DNS Benchmark analyzes the performance and reliability of up to 200 DNS nameservers. In addition to being tested for speed, each is tested for its redirection behavior—whether it returns an error for a bad domain request or redirects the browser to a commercial marketing-oriented page.
You’ll need about an hour to run the test and modify settings, but virtually all of the work is done by DNS Benchmark. All you need to do is avoid heavy internet traffic such as streaming video or large file transfers during the test.
There are two places where you can specify the IP address of your preferred nameservers. One is in the network settings of the computer (for Windows 11, search Settings for “Manage Network Adapter Settings”). The other is in router settings. Windows has options for primary and secondary nameservers and routers have at least two options, but some provide more. The machine-specific settings are tried first, followed by the settings in the router.
Click any small image for a full-size view. To dismiss the larger image, press ESC or tap outside the image.
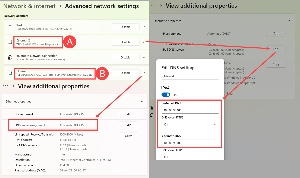 My primary computer shows two adapters because a VPN is present: One (A) is used when the VPN is on and the other (B) is used when the VPN is off. Clicking the down arrow for the adapter displays a panel that includes “View additional properties.” Selecting that opens a panel where you can edit the DNS settings. The options are Automatic, which means use whatever settings are in the router or the ISP default DNS, and Manual, which allows you to specify the DNS IP addresses.
It may seem that there’s a lot of technobabble here, and there is. You can ignore most of it. Just run the test, read the recommendations, and proceed. So let’s run the test.
 You may want to start by checking the network adapter settings the computer currently is using and also examine the router. If you haven’t made any changes, the computer’s DNS option will be Automatic and there will be no entries in (1) the router’s settings. Previously I had specified OpenDNS in the router and, at the start of this test, I was using Google’s DNS (8.8.8.8 and 8.8.4.4).
 Save a bit of time before running the test by having DNS Benchmark (2) create a custom list that’s based on your location. You’ll need to do this only once and it will take about half an hour. If you don’t seen an option to do this, select the Nameservers tab, click the Add/Remove button, and then click Build Custom Nameserver List.
After building the custom list, run the test and then open the Conclusions tab. Scroll down and pay particular attention to any sections shown in red. The results here show that I have the best nameservers for my installation, but they’re in the wrong order.
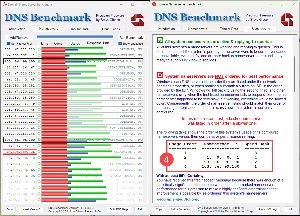 During the test, real-time information is displayed. The visual coding is complex and, if you want to know what it’s showing, visit the Gibson Research website. At the most basic, a green dot in the symbols column shows that the server is running and not doing anything dodgy. Orange markers show that the nameserver is responding, but will show an advertising page if you request a domain name with a typo. Red means that the nameserver does not respond.
Several bar graphs show other information:
The cached value will always be fastest, but uncached and DotCom values shouldn’t be excessive. Now it’s time to review the (4) recommendations.
 After running the tests, I returned to the router’s control panel and to Manage Network Adapter Settings in Windows Settings to make modifications. After making the changes, I ran the test again to confirm (5) that the DNS entries were in the right order.
In (6) Windows settings, I named Nord’s DNS addresses as primary and secondary. In the (7) router’s control panel, I set Cloudflare’s servers as primary and secondary. As a result, the Nord primary DNS will be tried first, followed by the secondary Nord server. If those are unreachable, Cloudflare’s primary and secondary servers will be tried.
Making these changes will improve your internet browsing, but just slightly. Don’t expect massive changes.
Download DNS Benchmark from Steve Gibson’s website and start making your web browsing just a bit faster. DNS Benchmark does not have to be installed, but it will create a text file in the directory where you run it.
Despite legal questions, limited resolution, and various other shortcoming's, Adobe's Generative Fill is nothing short of astonishing. It won't replace graphic designers and photographers, but it clearly has the ability to accelerate certain workflows.
Click any small image for a full-size view. To dismiss the larger image, press ESC or tap outside the image.
 I described an experiment with generative fill (Firefly) at the end of June, and mentioned that I might make some additional changes to the image. I wrote “The thumbnail of the person holding the cone is damaged. That could be fixed. The rectangular box at the left of the cone is distracting, and so is the yellow child carrier between the cone and the bike with the person in blue.” See my previous final version in the 30 June program.
Now here's what I changed. The thumbnail is fixed. I did that manually with the clone tool. The yellow child carrier is gone. I let Firefly do that and there's still an unneeded shadow that I don't find objectionable. I removed the rectangular box at the left of the cone using Firefly and the clone tool, and Firefly was able to remove the extra wheeled thing on the road without my assistance.
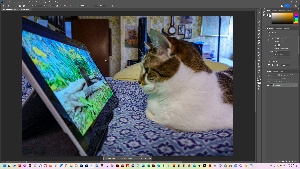 But generative fill can also give a photograph the appearance of an oil painting. I started with a photo of Chloe Cat sitting on the bed watching Kitty TV on a tablet computer.
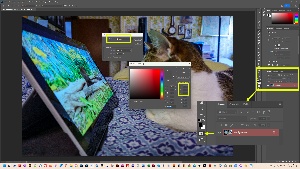 With the background layer selected, I activated the Quick Mask tool and then pressed Alt-Backspace. I could also have chosen Edit-Mask from the menu. The image needed a color mask with a 30% gray color. That displayed a mask on the image. After turning off the mask's visibility, I used the generative fill dialog box to request “oil painting” and then “pointillism painting”.
 Here are four of the nine resulting images. Four other images were unsuccessful because they warped the cat or removed an ear, but these four worked well.
Currently, Firefly is available only in the beta version of Photoshop, but the beta is public and anyone who has a subscription to a Creative Cloud plan that includes Photoshop can download the beta version and install it along with the production version.
I mentioned the chat application Beeper about a month ago, shortly after joining the beta program. Now it’s time for another look.
Besides making IMessage available on Android and Windows devices, Beeper is universal messaging app that lets users chat with anyone on chat networks such as WhatsApp, Telegram, Messenger, Signal, and more. Although a paid version will eventually be offered, it’s currently free and the developer says there will always be a free version.
Click any small image for a full-size view. To dismiss the larger image, press ESC or tap outside the image.
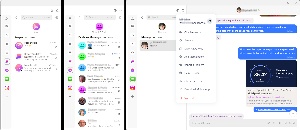 Beeper’s left panel changes depending on which chat service you’re using and there is one section that’s dedicated to messages from Beeper’s support team.
 The specialized Beeper tab has an Updates chat where updates are announced every few days, a Help chat that holds all of the messages between the user and the support group, and a third called Notes to Self.
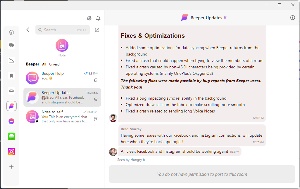 The support team is both proactive in announcing updates, system problems, and resolutions, as well as prompt in responding to messages from users. By “prompt” I mean responses are provided in minutes, not hours or days.
Notes to Self is surprisingly helpful. It’s not uncommon for me to encounter something that I’d like to pursue when I’m using a mobile device. Until Beeper arrived, I sent a link to myself using Messenger. It’s much better to be able to drop an encrypted note here.
 But there are annoyances. Probably the most significant is Beeper’s current inability to show previews of links. Beeper shows just a clickable link where Messenger would display a clickable preview. The preview provides enough information so that I can decide whether to follow the link. I’m hopeful that Beeper will add this feature.
If you use more than one messaging service, and possibly if you use just one, Beeper looks like it will be an app you’ll want. It supports Whatsapp, Facebook, Twitter, iMessage, Android SMS, Telegram, Signal, Beeper, Slack, Google Chat, Instagram, IRC (Libera.chat), Matrix, Discord, and LinkedIn.
All Beeper chat messages are end-to-end encrypted and when a network already encrypts messages, Beeper re-encrypts them.
Get started by visiting the Beeper website.