Listen to the Podcast
21 April 2023 - Podcast #828 - (19:22)
It's Like NPR on the Web
If you find the information TechByter Worldwide provides useful or interesting, please consider a contribution.

If you find the information TechByter Worldwide provides useful or interesting, please consider a contribution.
Reinstalling Windows 11, as I did a few weeks ago, gave me the chance to rediscover some of the “features” Microsoft offers that don’t work quite the way I want them to.
None of the annoyances are deal breakers and most of them barely reach the level of minor annoyance. Think of the 1-to-10 pain scale. These annoyances would hover around 1, but over time they do grate a bit. Maybe some of the annoyances bother you, too, so here’s how to fix them.
I have some command file and batch file icons on the desktop. One shuts the computer down, a second reboots it, and a third aborts either of those processes if I start it accidentally. I have to be fast because I’ve set the delay for both shutdown and restart to 5 seconds. The problem is that all three icons are identical and, if I’m not paying attention, I can select the wrong one.
You might think that’s not a big deal because they both shut the computer down even though it immediately starts again if I choose Restart instead of Shutdown. But they don’t always do the same thing. If you have Fast Start enabled, shutting the system down doesn’t fully clear memory; Restart does. I’ve turned off Fast Start because it doesn’t really make the computer start much faster and the advantage of fully clearing memory is worth the small delay.
So there are three small annoyances here: The icons all look the same, shutdown really should clear all memory, and the icons have Microsoft’s silly shortcut arrows attached. These are all easy fixes.
Click any small image for a full-size view. To dismiss the larger image, press ESC or tap outside the image.
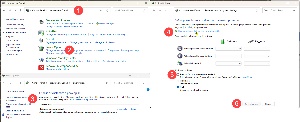 To make sure that shutting the computer down clears all memory, open the old-style Control Panel, choose (1) Hardware and Sound, click (2) Power Options, select (3) Choose What the power buttons do, click (4) Change settings that are currently unavailable, clear the check mark from (5) Turn on fast startup, and then click (6) Save changes.
Your computer will now take a few more seconds to start, but no problems will be carried forward from the previous session.
Before creating shortcuts, you might want to eliminate one more small annoyance. By default, Windows adds “- shortcut” to shortcut names. You can press F2 to rename the shortcut, but an easy Registry edit takes care of the problem permanently for all new shortcuts that you create.
Editing the Registry can be hazardous. Making a mistake can cause the computer to become unstable or even make it impossible for Windows to start. Be sure to edit the correct key because some keys have similar names. If you add a key or modify an entry, double check spelling, numbers, and key types.
Start the Registry editor (regedit) and navigate to HKEY_CURRENT_USER\SOFTWARE\Microsoft\Windows\CurrentVersion\Explorer.
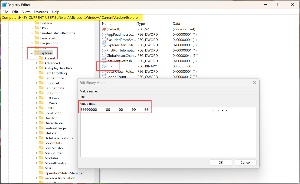 If a “link” value exists in the Explorer key, edit it. If not, create a new binary value with that name. Edit the value so that it contains all zeros and then either reboot the computer or log out and log in again. New shortcuts will no longer contain “- shortcut” as part of their name.
If you decide later that you would like to have shortcut names include “- shortcut”, return to HKEY_CURRENT_USER\SOFTWARE\Microsoft\Windows\CurrentVersion\Explorer and delete the link key.
 The three Desktop icons to shutdown, restart, or abort are custom-made shortcut files that are created directly on the Desktop. Right-click a blank area of the Desktop and select New > Shortcut. Activate the Shortcut tab and fill in the Target text box with the appropriate text for the operation:
There’s one more step to take if you have batch (.bat) or command (.cmd) files that you want to place on the Desktop. It’s not possible to associate a custom icon with command files or batch files, so first it’s essential to create shortcuts. Instead of storing command files and batch files on the Desktop, I place them in a directory where I keep utilities. To create a shortcut, navigate to the location of the batch file or command file, right-click it, and choose Create Shortcut. You can then move the shortcut to the Desktop.
 It’s helpful to be able to restart the Windows Explorer and the Windows Search process, so I’ve created a batch file to restart the Explorer and a command file to halt and then start Windows Search. If you need to perform either of these actions, here are the commands:
RestartExplorer.bat
taskkill /f /IM explorer.exe
start explorer.exe
pause
exit
RestartSearch.cmd
@echo off
net stop "Windows Search" && net start "Windows Search"
pause
exit
 Move the shortcut files to the Desktop. Command file shortcuts will have one type of icon and batch file shortcuts will have another, but it’s visually better if each shortcut has its own individual icon. Right-click the shortcut and choose Properties. Make sure the Shortcut tab is selected and click Change Icon. Windows will tell you that the file has no icon and then display the contents of shell32.dll, which contains a lot of icons. If you find one that you like, select it and click OK and then either OK or Apply. If not, click Browse and you can search for other files that contain icons.
To select from thousands of free icons, visit one of the following sites, download Windows Icon files (.ico) and save them to your computer.
You’ll find other sites that provide icons, but most are intended for use on websites. These sites offer PNG, SVG, FAVICON, and other formats. If you choose one of those files, you’ll need to convert it to an ICO file. It’s an easy process and there are free online services, but it’s another action to perform.
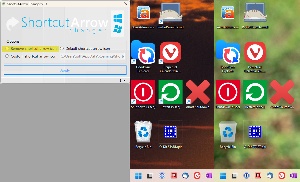 Now that you have essential commands on the Desktop and your own custom icons, there’s still the minor annoyance of those arrows on top of the icons to signify that they’re for shortcuts. If this is annoys you, the quickest and easiest solution involves downloading the free BTI Shortcut Arrow Changer.
Removing the shortcut arrow involves a Registry edit and the creation of a small transparent image. Neither of these steps is difficult, but the small utility takes care of both steps in less time that it takes to download the file. After downloading and installing the utility, run it, select Remove shortcut arrow icon, and press Apply. The arrows will disappear immediately.
So there, in just a few minutes, you’ll have eliminated several small annoyances.
I started with annoyances today, so as Lyndon Baines Johnson said frequently, let us continue. One of the first things I turned off after reinstalling Windows 11 was the seemingly never ending stream of interruptions.
I’d already turned off notifications about new email messages because I don’t like interruptions. If I’m working on something, I want to give my full attention to the it. Multi-tasking is for computer processors, not people. Some of us may think we can multi-task, but tests make it clear that we cannot.
When we’re interrupted, we stop attending to one thing and start looking at something else. There is perhaps no better example of our inability to multi-task than traffic crashes that result from a motorist’s attempt to text and drive at the same time. Multi-tasking while sitting at a desk is unlikely to have fatal consequences unless the desk you’re sitting at is a control station for a nuclear reactor, but every interruption is a distraction and distractions lead to errors.
Click any small image for a full-size view. To dismiss the larger image, press ESC or tap outside the image.
 The trouble is that dozens of applications want to notify me whenever they have something they want me to see. I leave all of the notifications on because sometimes (rarely, in fact) an application will want to tell me something that I do want to know even thought most notifications will be something that will be more to the company doing the notification than to me. But I also find a way to make them stop interrputing me even though they are enabled.
 Those who want to fine-tune notifications can open a settings panel for each application and turn various components on or off. That process can consume a lot of time. Instead, my preference is to receive no notifications except for those that I have enabled in currently running applications. Everything else can wait.
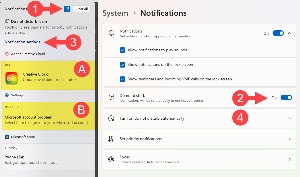 Yes, I’d like to know that there’s an update for an (A) Adobe Creative Cloud application, but I don’t need to know that when I’m writing an article for TechByter Worldwide. Likewise, I want to know if there’s a (B) problem with my Microsoft account, but I don’t need to know this unless it’s affecting something I’m working on.
The solution involves enabling Do Not Disturb mode and setting it to be on all the time. Once every day or two, I open the Notification panel and, if there’s something that needs my attention, that something gets my attention—100% of my attention.
The easiest way to turn Do Not Disturb mode on is to click (1) the small bell icon at the top of the notification panel. You can also flip the (2) toggle switch in Settings to activate Do Not Disturb.
Clicking (3) Notification Settings opens a detailed section where it’s possible to turn on or off notifications for individual applications, to enable Do Not Disturb mode when certain types of applications are active, or to (4) schedule times when you want Do Not Disturb mode to be active.
Scheduling is helpful if you don’t mind receiving notifications during some periods, but want to block them in other periods. Maybe you want to work uninterrupted for the first two hours each morning, but scheduling works for only one period per day. You couldn’t, for example, turn on Do Not Disturb during the first two hours and the final hour of the day.
When you use the scheduler, you can specify that the quiet period occurs during a specific time every day, weekdays, or weekends. Scheduling is something developers will need to improve. Currently, it’s quite limited.
These are the settings for Windows 11. In Windows 10, this is known as Focus Assist and there are fewer option. Choices in Windows 10 are Off, Priority only, and Alarms only.
Anybody who has ever thought about creating a podcast has probably thought about background noise, audio quality, and such. If not, they should have.
When you’re chatting with someone, neither of you notices background noise unless it’s uncommonly loud. That’s probably because our brains easily differentiate between noise and what the person across the table is saying. Microphones don’t work that way because they can’t differentiate between speech and noise.
I once heard a podcast created by someone who lived adjacent to the elevated Brighton line in Brooklyn. When the trains rumbled by, not even the best soundproofing would have helped much. The only solution would be to wait for the train to pass, but trains are frequent. He decided to ignore the trains, much to the detriment of the podcast.
When I’m recording this podcast, I wait while for fire or police equipment to pass the house, as well as for National Guard helicopters, FedEx plains headed for Don Scott airport, and trash collection trucks. There is some soundproofing, but it’s not sufficient to deal with loud noises. Fortunately, the area is quiet most of the time.
But even quiet noises can be distracting—the sound of a fan that’s part of a heating or cooling system, for example. Here’s an example of a recording made with a fan running in the background.
Adobe has a free service that can be used to improve this kind of sound using the company’s Sensei artificial intelligence.
This service is free now, but that may not always be the case. It may eventually be bundled into Audition, Adobe’s sound processing application. Or it may continue to be free as are some of Adobe’s image processing utilities.
Click any small image for a full-size view. To dismiss the larger image, press ESC or tap outside the image.
Take a look at the sound wave forms.
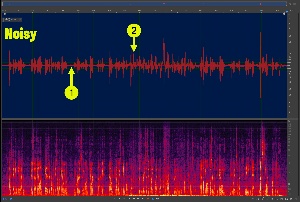
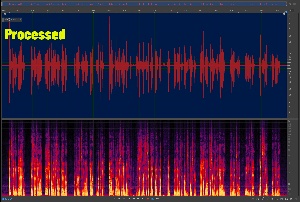 The sound levels window clearly shows (1) the high amount of noise in the recording and (2) noise caused by handling the microphone. Once the audio has been processed by Adobe Podcast, the sound levels clearly reveal the improvements.
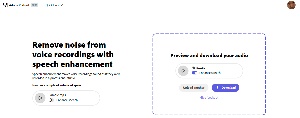
Access to Adobe Podcast requires an Adobe account, but a free account is sufficient now. Once you have an account, free or paid, request access. This is usually granted immediately.
 With photography, it’s always better to get things right in the camera. The less post processing, the better the final image will be. That’s equally true with audio. Sensei makes astonishing, nearly magical, improvements to low-quality audio, but it’s better to use it only when you must.
I heard an interview on NPR last week. The person being interviewed was recorded using an uncommonly poor Skype connection and the interview was nearly unlistenable. This was clearly an interview that had been recorded hours, or possibly days, earlier and I wondered why post processing hadn’t been used to improve the sound.
Adobe Podcast is an outstanding tool to have in any audio toolkit.