Listen to the Podcast
10 June 2022 - Podcast #796 - (20:30)
It's Like NPR on the Web
If you find the information TechByter Worldwide provides useful or interesting, please consider a contribution.

If you find the information TechByter Worldwide provides useful or interesting, please consider a contribution.
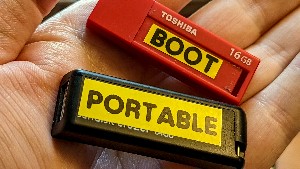
When something goes wrong with your computer, you might wish you had quick access to some utility applications. But because something has gone wrong with your computer, you might not be able to get to them. That's just one reason for having a thumb drive with a selection of portable applications.
Click any small image for a full-size view. To dismiss the larger image, press ESC or tap outside the image.
 This is different from the recovery bootable USB drive that I've described previously, but it's worth taking a quick look at that process again. Most backup applications offer to create a recovery disc or thumb drive for you. The illustrations are from AOMEI Backuppper Professional; your backup application may be different, but the underlying concepts are the same.
A bootable thumb drive is the best choice, but most applications also allow the user to create an ISO file that would need to be burned to a DVD or to burn a CD or DVD directly. If your preference is a thumb drive, plug it in and make sure that it contains no files that you want to keep; then start the backup program and find the option for creating recovery media — probably in a Tools menu.
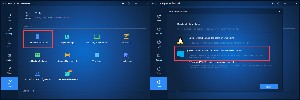 You may have the option of creating a Linux recovery device or a Windows PE device. Most users should choose the Windows PE device and select an option to download the PE environment from the internet unless a copy already exists on the computer.
A few minutes after you start the process, your bootable USB drive will be ready. If your backup application doesn't offer the ability to create a recovery disk, see this Disk Partition tutorial or refer to one of these instructional articles.
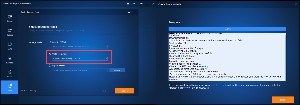 The recovery USB drive need not be large because the files consume less than 700MB of space. Resist the temptation to use this thumb drive as the target for installing the portable utility apps because the bootable USB drive must be formatted as a FAT32 (File Allocation Table 32) device. Because of the limitations of FAT32, you'll want a disk formatted as exFAT (Extended File Allocation Table) or NTFS (NT [New Technology] File System] for portable apps.
Before I describe the second disk, let's think about how the emergency boot disk will be used. To use a recovery disc or thumb drive, you'll need to modify the computer's boot order so that the optical drive or thumb drive is queried first, before the hard drive. That requires modifying the computer's CMOS settings. There are two options here: You can modify the settings now so that the computer always looks at the alternate devices first or wait until there's a problem and change the settings then. Changing the settings now will make the boot process take longer because the boot loader will need to look at any attached USB devices to see if a bootable device is attached. That will slow the startup process. Even if you don't make the changes now, it's a good idea to investigate how to get to the CMOS settings before you need to get to the CMOS settings.
The recovery USB drive or disc is something you'll rarely need. With luck, you'll never need it. Think of it as an insurance policy. The portable applications drive is one that might use frequently.
A thumb drive with a lot of portable apps will be useful in cases like these:
Those are a few of the use cases that come to mind and the solution is PortableApps. This is a free application and service that offers more than 400 portable applications. An application is considered to be portable when it can be run as-is without being installed. The applications range from accessibility and development tools to games and security functions. There are music and video players, office applications, photo viewers and editors, graphics applications, and design programs. If you install every single one, you'll need a thumb drive with more than 46GB of storage; but, as we saw last week, even large thumb drives are inexpensive. And you don't need to install everything. There's an entire section of games. If you don't care about games, you won't want these.
Before going further, I have to say that — although the applications are free — you may see suggestions to upgrade to paid versions of some applications. Many of the applications and suites offered by PortableApps are free: OpenOffice and LibreOffice, for example. Others are free versions of commercial software that will suggest purchasing a paid version that has more features. Spybot Search and Destroy is fully functional, but it will recommend that you pay for a version that includes real-time antivirus protection. But everything offered is legitimate and without cost.
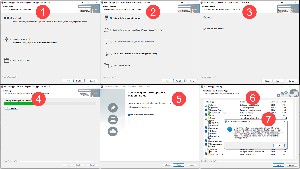 Preparing PortableApps is easy.
 Using The Applications
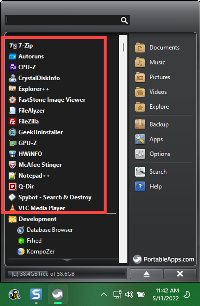
To use an application on the thumb drive, plug the thumb drive in, view it in a file explorer, and double-click start.exe. The PortableApps icon will appear on the Taskbar and a menu with the applications you've selected will be shown in the lower right corner.
To place the applications you'll use most often at the top of the menu, scroll through the applications, right-click an application name, and select Favorite from the context menu. To use one of the applications, click its name in the menu and it will open.
 Consider this use case: Perhaps you're at a friend's house when you receive an urgent email on your phone. The message needs an immediate reply, but the reply will be complex, far more than a simple one-sentence response. You wish you'd brought your computer, but it's at home.
So you ask permission to use your friend's computer, insert your PortableApps thumb drive, launch Thunderbird, collect your messages, compose a two-page response and send it. This scenario does require a bit of preparation: After creating the PortableApps thumb drive, you would open Thunderbird and set up your email account using the Internet Message Access Protocol (IMAP). Using IMAP will leave all of your messages on the server even if you prefer to use the older Post Office Protocol (POP3) on your primary computer.
When you close Thunderbird and remove the PortableApps thumb drive, you will have left no traces behind on the computer.
The thumb drive can also contain a variety of security applications and diagnostic utilities.
PortableApps users can create an account, but they don't have to. They can donate, but they don't have to. New functions are added to the PortableApps application from time to time, new applications are added, and your installed applications are checked and updated whenever you open PortableApps. Get started by downloading PortableApps from the website.
After creating a PortableApps drive, you may think of some additional utilities that you'd like to have constant access to. Presuming the thumb drive has sufficient free space, just copy those applications to the thumb drive.
Instead of placing the extra apps in the root directory, I think it's a good idea to create a directory called UTILITIES and placing the extra files there. Here are some that are helpful to have.
Click any small image for a full-size view. To dismiss the larger image, press ESC or tap outside the image.
 You may want a few other applications on the thumb drive too, ones that have to be installed. These are useful when you need to help a friend or family member diagnose and fix a problem with their computer.
Those are just some of the extras to consider adding to your thumb drive. There are probably other small applications that you use at least occasionally. If there's one you feel would be helpful when something has gone wrong, it belongs on that thumb drive.
Continuing the theme of utility programs, let's take a closer look at the Belarc advisor. It's designed for IT professionals in enterprise settings, but it's a gem for use at home, too.
Because the Advisor is intended for use in a corporate environment along with Belarc's enterprise computer management tools, not all of the information will be useful. Users will need to be cautious not to make unnecessary modifications, and I'll get to that in a moment. First, though, consider the massive amount of information that it reveals.
Click any small image for a full-size view. To dismiss the larger image, press ESC or tap outside the image.
 After the user starts the Advisor and grants administrator privileges, the analysis begins. A minute or two later, the summary page will appear on the default web browser. Information about your computer is stored on a local file in C:\Program Files (x86)\Belarc\BelarcAdvisor\System\tmp\. None of this information is sent to Belarc. The file will be the name of the computer with an HTML extension. Two other HTML files will be present, and these will be displayed when the user selects an option from the main report.
The report includes a security benchmark score, information about virus protection, and an indication of whether security updates are current at the top. Then there's detailed information about the operating system, computer make and model, processor data, and a list of physical and logical disk drives, including total capacity and remaining free space. User accounts and printers are listed. Memory modules are identified and their locations are shown. Multimedia devices are listed, as are Bluetooth, Ethernet, and Wi-Fi connections. All USB devices that have been connected to the computer in the past 30 days are listed, as are network devices. Software names and versions are shown near the bottom of the list. At the end of the page, all Windows hotfixes are shown. Many of the items in the various parts include links to additional details or explanatory notes.
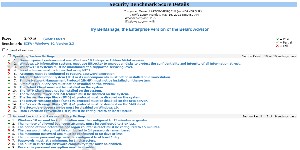 The security benchmark report gave my computer a rating of 3.97 of a possible 10 points. That seems disturbingly low, but that's because the application is designed for enterprise use. Three of the failures are shown in the operating system settings section of the report:
The security benchmark summary included 10 major sections with a total of 209 individual tests. Most home computer users will see several flags, but remember that these tests are intended for corporate environments. Take care not to make a change unless you know exactly why you're making the change. Each flagged item has a link to a detailed explanation that can help users determine whether a change is needed.

𝙎𝙚𝙫𝙚𝙣 𝙂𝙞𝙫𝙚𝙖𝙬𝙖𝙮𝙨 𝙏𝙝𝙖𝙩 𝙏𝙝𝙚 𝙈𝙚𝙨𝙨𝙖𝙜𝙚 𝙊𝙣 𝙏𝙝𝙚 𝙇𝙚𝙛𝙩 𝙄𝙨 𝘼 𝙎𝙘𝙖𝙢
1. Claims to be from American Express but the from address is invdsl@psginterior.com, and it was actually sent from an account hosted on Rackspace in Texas.
2. The reply-to address is yfudh@opifdfjk.com.
3. The primary recipient is is shown as "User <invdsl@psginterior.com>", meaning my address was included as a blind copy. Additionally the address this message was sent to is not the address I use with American Express.
4. The American Express logo is inaccurate. American Express has used the logo on the real message, with only minor variations, since 1974.
5. The final digits of the supposed American Express account are not shown.
6. I am addressed as "Card Member" and not the name on my card.
7. The link goes to a phony shortened URL on a service that may be housed in the Dominican Republic and not to American Express
𝙁𝙤𝙪𝙧 𝙄𝙣𝙙𝙞𝙘𝙖𝙩𝙞𝙤𝙣𝙨 𝙏𝙝𝙖𝙩 𝙏𝙝𝙚 𝙈𝙚𝙨𝙨𝙖𝙜𝙚 𝙊𝙣 𝙏𝙝𝙚 𝙍𝙞𝙜𝙝𝙩 𝙄𝙨 𝙍𝙚𝙖𝙡
8. The message was sent by American Express from an American Express server.
9. The message was sent to me at the special address I use for American Express.
10. The message includes my name exactly the way it's on file at American Express.
11. The message includes the true final digits of my account and the card shown illustrates the type of Amex card I have.