Listen to the Podcast
22 Apr 2022 - Podcast #789 - (19:57)
It's Like NPR on the Web
If you find the information TechByter Worldwide provides useful or interesting, please consider a contribution.

If you find the information TechByter Worldwide provides useful or interesting, please consider a contribution.
Sometimes little tweaks can make a computer much more enjoyable to use. Or much less annoying to use, depending on your point of view. Let's take a look at three changes I've made recently.
We no longer have any Windows 10 computers in the house, but relax if you have Windows 10 because all three will work just fine with Windows 10. Windows 11 has a lot more in common with Windows 10 than it has differences. Had it not been for hardening some security functions that have specific hardware requirements, Windows 11 might well have been called Windows 10.0000001.
But let's stop wasting time and move on to the tweaks.
Microsoft establishes a lot of default applications, procedures, and functions. Fast Startup is one of these and it does speed the boot process in most cases. It may also create some unexpected problems.
It's helpful to understand what Fast Startup does. When the user selects Shut Down from the Power menu, the computer shuts off. You might expect that this clears system memory, but it doesn't. Fast Startup creates a kind of hybrid state that writes information about all currently open applications and processes to disk before turning the computer off. When the user starts a system that has Fast Startup enabled, all of that saved information is reloaded at boot time. Because applications and services don't have to be restarted, Windows is ready for use faster.
That's exactly what you'll want most of the time, but there are two situations in which Fast Startup can be a problem.
First, and the most common problem, is for users who are trying to clear an operating system issue. The age-old procedure involves shutting the computer down, waiting a minute or so, and then restarting it. But if there was a problem with memory corruption involving a running process, that same corruption will be reloaded by Fast Startup.
The solution to this problem is not to use Shutdown when you want to fully clear memory. Instead, select Reboot, which does clear the system's RAM and writes nothing to disk during the process. As long as you remember to use Reboot instead of Shutdown, there's no need to do anything more.
Second, though, is a more thorny problem — one that's evident on my computer, but not on my wife's computer.
My computer has a process that can record Skype calls. Files are written to one of the external drives, and that drive won't have been mounted and ready for use when the recorder application is restored from the boot drive's disk image. As a result, the recorder application displays an error message to let me know that it can't find the directory where it's supposed to write its files. The same is true for a few other applications that need access to configuration files that are not on the computer's built-in C drive.
In this case, the solution involves turning Fast Startup off. Most people won't need to do this, but here's how to do it if Fast Startup creates a problem for your computer. It's a bit more complicated than it should be because the controls needed aren't yet in Settings. You'll need the old Control Panel.
Click any small image for a full-size view. To dismiss the larger image, press ESC or tap outside the image.
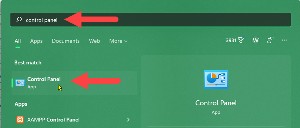 So press the Windows key and type control; then choose Control Panel from the list.
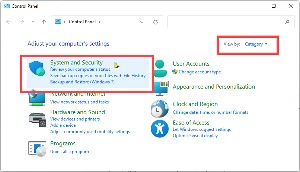 Make sure you have the Category listing selected, and then click the System and Security section.
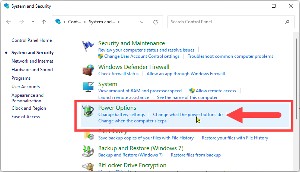 Click Change what the power buttons do in the Power Options section of the next screen. This will open yet another window.
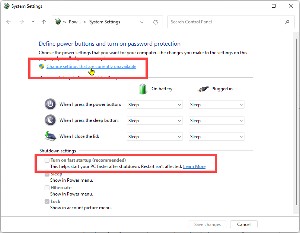 Under the section titled Define power buttons and turn on password protection, select Change Settings that are currently unavailable. This will make Shutdown settings in the lower half of the panel editable. Turn on fast startup (recommended) will be selected by default.
Clear the check mark on the Fast Startup option, then save the changes. Now when you shut the computer down, all memory will be cleared so the computer will start with a fresh slate.
If you're wondering how much slower startup is with this option turned off, it's noticeable, but just barely. With Fast Startup enabled, the computer starts in less than 30 seconds. But then I have to deal with error messages from several applications. With Fast Startup disabled, the boot process take about 50 seconds, but there are no error messages to deal with.
God Mode has been around for years and provides quick access to lots of settings. Although it may be less important as settings are migrated from the Control Panel to the new Settings app, it's quite helpful when you need something from the old Control Panel.
 In fact, if you had God Mode enabled for the previous tip, navigating to the location where you can disable Fast Startup would be much easier: Open God Mode, type power buttons in the search field, and choose Change what the power buttons do.
You don't really need God Mode, but it provides quick access to more than 200 settings, controls, and apps. They are arranged alphabetically in 33 categories, so instead of drilling down through several layers of the Control Panel's menus, you'll get where you want to go with just a bit of text and a single click.
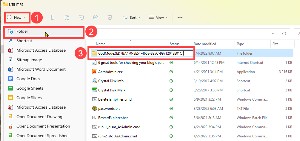 Creating God Mode is easy, and you can call it anything you want if "God Mode" is a problem. Start on the computer's Desktop or any other location where you'd like this special folder to be. I have a folder called UTILITIES on the Desktop and that's where I put the God Mode folder. But I named it The Devil Made Me Do It.
Select (1) New, (2) Folder and (3) name the folder:
GodMode.{ED7BA470-8E54-465E-825C-99712043E01C}
 The part inside the curly braces must be exactly as shown and there must be a period between the text you use and the part in braces. Also, the text can't have any spaces. If you decide to (1) rename the folder later, you'll see that the name doesn't show up in the (2) directory listing. Only the icon is present, but when God Mode is open, (3) the name you created will appear.
The UTILITIES folder on my computer's desktop contains a list of possible passwords, not passwords that are in use. No credentials that are in use should ever be stored in plain text on the computer. AeroAdmin is present for times when I need to connect to someone else's computer. Crystal Disk Info and Crystal Disk Mark are included so that I can quickly check the health of disk drives.
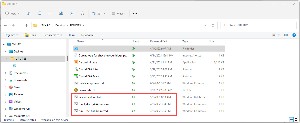 But notice DeleteTempFiles.cmd, RestartExplorer.bat, run-1_dism_AsAdmin.cmd, and run-2_sfc_AsAdmin.cmd. These are batch jobs that I need occasionally. As you'd expect DeleteTempFiles.cmd, deletes temporary files. RestartExplorer.bat can be helpful if the Task Bar disappears. Although I haven't encountered this problem with Windows 11, it's good to know that this command will kill the existing Windows Explorer job and restart the process. This can avoid a nasty power-off reset. DISM and SFC are a couple of commands that I run at least once per month so that the operating system will fetch any updated system files from Microsoft and then check for any corruption in system files.

 I would generally use MacroExpress to record these commands and then play them back in a Command window or a PowerShell window. But when either of these is being run as Administrator, it won't accept input from MacroExpress. To use one of the processes, I simply right click it and choose Run as Administrator. I've set the background color to be red when Administrator permissions are in effect.
So there you go — three quick and easy tweaks that can make Windows easier to use. And if you'd like to use any of the command files, I'll place them below. Copy the text and paste it into a text editor such as Notepad++, then save the resulting file to your preferred location.
DELETE TEMPORARY FILES (DeleteTempFiles.cmd)
Be sure to change USER to your user name!
@echo off
echo ############# Deleting Temporary Files #############
echo Please wait. Press any key to close this window when the process is complete.
echo ####################################################
del /S /q c:\Windows\temp\*.*
del /S /q c:\$RECYCLE.BIN\*.*
del /S /q c:\Windows\temp\*.*
del /S /q C:\Users\USER\AppData\Local\Temp\*.*
echo The process is complete.
timeout /t -1
exit
RESTART WINDOWS EXPLORER (RestartExplorer.bat)
REG DELETE HKCU\Software\Microsoft\Windows\CurrentVersion\Explorer\Streams\Desktop /F
taskkill /f /im explorer.exe
taskkill /f /im shellexperiencehost.exe
del %localappdata%\Packages\Microsoft.Windows.ShellExperienceHost_cw5n1h2txyewy\TempState\* /q
start explorer.exe
RUN DEPLOYMENT IMAGE SERVICING MODULE (run-1_dism_AsAdmin.cmd)
@echo off
echo ############# CHECKING FOR NEW SYSTEM FILES #############
echo Please wait. Press any key to close this window when the process is complete.
echo ####################################################
dism /online /cleanup-image /restorehealth
echo The process is complete.
timeout /t -1
exit
RUN SYSTEM FILE CHECKER (run-2_sfc_AsAdmin.cmd)
@echo off
echo ############# CHECKING SYSTEM FILES #############
echo Please wait. Press any key to close this window when the process is complete.
echo ####################################################
sfc /scannow
echo The process is complete.
timeout /t -1
exit
Here's an amusing little scam that arrived in this week's email.

If you would be inclined to tell me that "till" is acceptable where (4) I've grumbled about it, I have to admit that you would be absolutely correct even though I think of "till" as a place where stores place the money they receive from customers. I still consider it to be less common than "til" or "until", but probably I should have called out the comma, instead of a period, at the end of one sentence. In any event, there's no shortage of obvious clues that this is bogus.
Although it's possible to burn a CD, DVD, or Blu-ray disk with Windows, I've long been a fan of ImgBurn. It's a free utility that makes quick work of the process.
When you download the application, you may be surprised to see that it hasn't been updated for nearly a decade. Version 2.5.8.0 was released on 16th June 2013. Version 1 was released in 2005 and one or more updates were issued every year until 2013.
The application comes with an extensive set of instructions for the user:
It doesn't have to be that simple, though. ImgBurn has a lot of settings that users can tinker with, and the ImgBurn forum has a section called Guides where you'll find helps. But the basic operation really is not difficult.
Click any small image for a full-size view. To dismiss the larger image, press ESC or tap outside the image.
 When you load a writable CD, DVD, or Blu-ray disk and start ImgBurn, you'll see six options on what the developer calls the EZ-Mode Picker:
In practice, most people will use one of the top two function to either create a disc from an image file on the hard drive or to write a set of files and folders to a disc. So let's assume that I have a series of three old dance recital videos that have been converted from video tapes. We can assume that because I do.
 So I select Write files/folders to disc and then (1) drop one of the files into the Source window. That's because the files are all large and only one will fit on the disc. If you give ImgBurn more data than will fit on a disc, it issues a warning. ImgBurn tells me that it's ready to create the disc, so all I need to do is (2) press the Start icon. Because I haven't yet specified a volume label for the disc, (3) ImgBurn offers a suggestion and then (4) displays a bit of information about the project.
 The application tells me that burning the disc will take about four minutes and, about four minutes later, the process is complete. Because the Verify option was checked, ImgBurn reads the disc, compares it with the source data, and then tells me the process was successful.
If you have an ISO or CAB file, or any other type of disc image file, you'd choose the Write image file to disc option as the first step, then drag that file into the Source window. It doesn't get much easier than this!
Note: Some versions of the ImgBurn installer have been known to include potentially unwanted programs (PUPs). When these have been present, they are not hidden and the user has the option to refuse them. I downloaded the installer file from the ImgBurn website on 5 Apr 2022 and found no additional components. Checking for PUPs is something everyone should do when installing any application — free, shareware, adware, or commercial. Read the text you're shown by the installer and use the advanced installation option if the installer has one.
For more information, or to download ImgBurn, visit the developer's website and if you want to explore the advanced options, check out the Guides section.
When Windows starts up, it displays a lock screen with an attractive image that changes frequently. Pressing any key or clicking the mouse dismisses the lock screen and displays the login screen. Maybe you don't like the lock screen and would like to eliminate it.
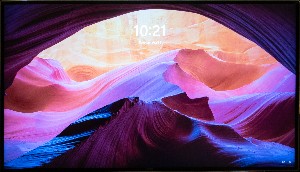
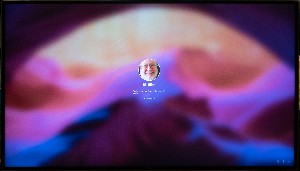 It's easy to eliminate the lock screen and save half a second at boot time. If you're so inclined, you'll need to edit the Registry.
<< Lock Screen
Login Screen >>
Editing the Registry can be hazardous. Making a mistake can cause the computer to become unstable or even make it impossible for Windows to start. Be sure to edit the correct key because some keys have similar names. If you add a key or modify an entry, double check spelling, numbers, and key types.
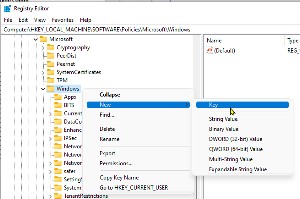 Press the Windows key and R, then type regedit. Press Enter and accept the User Access Control warning. When the Registry Editor opens:
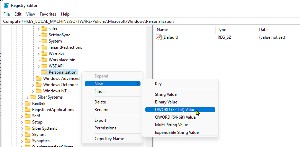 Select the Personalization key and right-click it. Then choose New, DWORD (32-bit) Value.
 To test, press the Windows key and L to lock the computer. Instead of seeing the lock screen, you should see just the login screen. This also holds true when you start the computer: Instead of seeing the lock screen, you'll be taken immediately to the login screen.
If you later decided that you miss the pretty picture from Microsoft, just return to Computer\HKEY_LOCAL_MACHINE\SOFTWARE\Policies\Microsoft\Windows\Personalization and change the value of NoLockScreen from 1 to 0.